25 reasons to switch to Webpack(er)
Leaving behind the Rails asset pipeline
I've been getting this question lately in some form or another:
Is webpack and Webpacker worth the hassle?
It's a good question, but my short answer is yes.
Given the sharp rise of mindshare in the JavaScript community in recent years, there has been a great deal of innovation in tooling, development experience, and optimization for frontend development.
Rails was once at the forefront—the Rails asset pipeline was a huge leap forward when it was released—but it hasn't kept up in this department. Outsourcing JavaScript and CSS dependency management and asset bundling is smart economics at this point.
In this post, I will elaborate on why I think think it's a good idea to make the switch. But this will assume some prerequisites; in other words, we'll first consider why you might NOT want to switch and instead stick with the Rails asset pipeline.
Subscribe to my newsletter, Joy of Rails, to get notified about new content.
Why not switch?
If you're a Rails dev and your app is currently using the Rails asset pipeline, here are a few reasons why webpack and Webpacker might not be a good fit for you.
- You don't have the right application
If your application doesn't use much JavaScript, it's probably not worth the switch. Do you spend less than 5-10% of your development time working on JavaScript? Your app might not warrant a more substantial tool like webpack.
- You don't have the time
I'll be the first to admit that adopting webpack for the first time requires patience. Things work differently than with Sprockets. You may need to invest time learning a new paradigm. webpack and NPM dependencies are upgraded at a rapid pace, so you need to keep up with upgrades. You might also have to understand how JavaScript modules work—good news; those skills are transferrable.
- You don't have the right mindset
Yes, webpack is complex. Plenty of developers love to complain about this fact. If you think you're one of those developers, you probably won't enjoy the process of adopting webpack. A lot of frustration can be eased through education. Make sure you've got a positive attitude going in.
All that said, given a little time, the need, and the right mindset, you'll be successful upgrading to Webpacker. Here's a list of ways you'll benefit.
1. Webpacker is the future of Rails
Webpacker is now the default JavaScript compiler for new Rails apps. Rails 6 apps will still include both Sprockets for managing CSS and images, but JavaScript dependencies are meant to be bundled by Webpacker. The Rails defaults fall in line with how Basecamp builds web applications, and it may benefit your team to "go with the herd" to stay closer to Rails edge and attract candidates who are looking to work with more advanced tools.
2. Sprockets is dead; Long live Sprockets
Sprockets development may have slowed in recent years, but it's not going away anytime soon. Sprockets version 4 was recently released, thanks to hard work led by Richard Schneeman. The default Rails setup encourages developers to use both Webpacker (for JavaScript compilation) and Sprockets (for CSS and images) side-by-side.
The ability to use both compilers in the same application is a real advantage for teams making the switch; this opens the door to an iterative migration, which may be desirable to de-risk the transition.
3. It will change the way you write JavaScript for the better
Prior to Rails support for webpack through Webpacker, most of the Rails apps I've worked on or seen either directly on GitHub or implicitly through tutorials or presentations, have fallen into one of the following categories:
- jQuery spaghetti
- Bespoke module implementation
- Combination of 1. and 2.
What's wrong with this approach?
- Accidentally leaking JavaScript into the global scope
- Difficult to share code
- Order-dependence when requiring code
- Very difficult to understand the implicit dependency graph
- Very difficult to load code asynchronously
Writing your JavaScript source code within a module system allows you to take advantage of module scope within each file, i.e., no accidental leaking of code into the global scope. No more bespoke module implementations.
4. Enjoy the power of ES modules
There seems to be little doubt now that ES modules are the future of JavaScript. As the new EcmaScript standard, eventually, we'll be able to use ES modules in browser and server-side runtimes, like Node.js. With support for both synchronous and asynchronous imports, they may eventually phase out early module specifications, like CommonJS and AMD altogether.
Of note, ES modules employ live bindings, meaning when an exported module changes a value, it can be read in the importing module. In addition to being useful potentially for application logic, this feature allows ES modules to support cyclic dependencies.
For more on how ES modules work, check out this cartoon deep dive.
5. $JAVASCRIPT_FRAMEWORK not required
Contrary to popular belief, you don't need to use a popular frontend framework, React, Vue, Angular, or Svelte, to take advantage of what webpack has to offer. It works just great with "vanilla JS" or even jQuery-based apps.
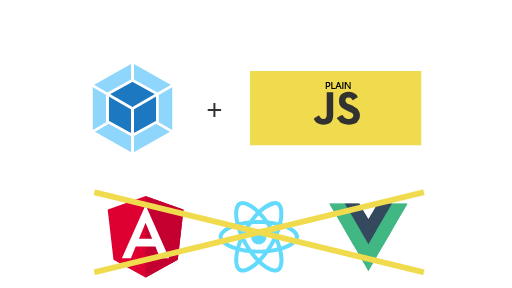
I don't believe single-page applications are worth the extra effort and complexity for the majority of CRUD-based apps—the Rails sweet-spot. Employing "JavaScript sprinkles" still makes a lot of sense in 2020, and webpack should be considered an advantage.
6. Take advantage of alternative file structures
Webpack opens the door to a great deal of customization of how JavaScript source files are structured. Perhaps the most popular JavaScript framework, React.js, introduced us to JSX, which allows developers to challenge the old notion of separation of concerns to write HTML-like JavaScript code to co-locate HTML and JavaScript source for components.
Vue.js is famous, in part, for its support for Single File Components, which allows developers to co-locate HTML, CSS, and JavaScript as separate portions of a single file.
Example:
<template>
  <div>Hello, {{ name }}!</div>
</template>

<script>
export default {
  data() {
    return {
      name: 'World',
    }
  },
}
</script>

<style scoped>
div {
  background-color: aliceblue;
  padding: 1em;
  font-size: 2em;
  text-align: center;
}
</style>
This is not (to my knowledge) an approach that would be easily handled in the Rails asset pipeline.
7. You'll have a better way to manage dependencies
I've always found Rails "asset gems" to be a significant pain. In most cases, you can replace your asset gems with Node Package Manager, or NPM, dependencies.
![]()
NPM has become the primary repository for distributing open-source JavaScript packages. Although initially designed for packages intended to be used with the Node.js runtime, over time, it has also become the default for browser-based packages. This means that both libraries that run on Node.js, like webpack, and libraries in the browser, like React, Vue, and jQuery, can all be distributed over NPM. Using NPM is a vast improvement over the typical for sharing JavaScript and other assets for the Rails asset pipeline. One significant point of friction with the latter approach is having to maintain both a Ruby version along with the version of the packaged assets. This technique has always felt cumbersome and bolted on.
It's worth mentioning that you can still try managing assets via NPM and make them available to the Rails asset pipeline by adding node_modules to the Sprockets load path. Again, this approach is cumbersome and can potentially adversely affect build times depending on scope.
8. Stop using jQuery plugins (if you want)
One benefit of jQuery plugins before the adoption of modules is that it provided a means to add functionality without polluting the global scope. With a proper module system, as you'd get with webpack, you need not attach functionality to the jQuery instance to reference it across the application.
Consider the touch-responsive carousel plugin Flickity. In the Rails asset pipeline, you might use it as follows:
//= require flickity

$(function () {
  $('.main-carousel').flickity({
    contain: true,
  })
})
Flickity is also intended to work without jQuery, meaning you can implement the Flickity module in a webpack environment:
import Flickity from 'flickity'

document.addEventListener('DOMContentLoaded', () => {
  const elem = document.querySelector('.main-carousel')
  const flkty = new Flickity(elem, {
    contain: true,
  })
})
You can leave the jQuery out of this interaction altogether.
9. Compile ES2015+ syntax to ES5 with Babel
CoffeeScript was popular when it was first introduced because it offered a cleaner, Ruby-ish syntax. Many of these ideas and more have made there was into recent versions of EcmaScript. I love writing JavaScript in ES syntax even more than I loved CoffeeScript.
Here's a shortlist of just some of the great ways the language is evolving:
- ES2015+ is a superset of ES5, so all your current ES5 code is also ES2015+ code
- Replace
varwith scope-constrainedlet/consthttps://exploringjs.com/es6/ch_variables.html - Destructuring, Replace
argumentswith ...rest parameters, https://exploringjs.com/es6/ch_destructuring.html - Replace
apply()andconcat()with (...) spread operator - Replace constructors with classes https://exploringjs.com/es6/ch_classes.html
- Arrow functions https://exploringjs.com/es6/ch_arrow-functions.html
- New OOP features https://exploringjs.com/es6/ch_oop-besides-classes.html
- Replace function expressions in object literals to method definitions https://exploringjs.com/es6/ch_oop-besides-classes.html#sec_new-features-obj-literals
- New array and string methods, new number and Math features
- New primitive type Symbol https://exploringjs.com/es6/ch_symbols.html#sec_overview-symbols
- Template literals https://exploringjs.com/es6/ch_template-literals.html
- Generators https://exploringjs.com/es6/ch_generators.html
- Proper Maps and Sets https://exploringjs.com/es6/ch_maps-sets.html
- for-of loop https://exploringjs.com/es6/ch_for-of.html
- Promises https://exploringjs.com/es6/ch_promises.html
- Proxies, for metaprogramming https://exploringjs.com/es6/ch_proxies.html
10. Opt-in/out of experimental ES features
The Babel integration allows developers to take advantage of next-level and experimental EcmaScript syntax.
- async/await https://exploringjs.com/es2016-es2017/ch_async-functions.html
- decorators https://www.simplethread.com/understanding-js-decorators/, https://www.sitepoint.com/javascript-decorators-what-they-are/
- spread operator for object literals https://exploringjs.com/es2018-es2019/ch_rest-spread-properties.html
11. Target specific browser versions
Imagine how great it would be if you could code-ify your application's supported browsers? Well, with Webpacker, you can.
Babel integrates with a package called browserlist, which allows projects to codify the browsers they wish to target with their transpiled code. Developers set their version lists using queries, which can target specific browser versions or use semantics like last 2 versions to avoid updating versions manually. Browserslist uses data provided by Can I Use to determine browser support for newer frontend APIs.
Now we can write future JS syntax:
const array = [1, 2, 3]
const [first, second] = array
Babel will compile it for Edge 16:
const array = [1, 2, 3]
const first = array[0],
  second = array[1]
- Browserlist: https://github.com/browserslist/browserslist
12. Polyfill newer browser APIs
Building on number 11, Webpacker's use of @babel/preset-env to makes it possible to specify more easily what new JavaScript APIs to polyfill automatically.
It works by inserting this code at the top of your dependency graph:
import 'core-js/stable'
If chrome 71 is targeted, then this will get replaced with:
import 'core-js/modules/es.array.unscopables.flat'
import 'core-js/modules/es.array.unscopables.flat-map'
import 'core-js/modules/es.object.from-entries'
import 'core-js/modules/web.immediate'
Now you can start removing those conditionals you've been adding to test for browser support.
13. Use TypeScript
TypeScript has gained in popularity in recent years.
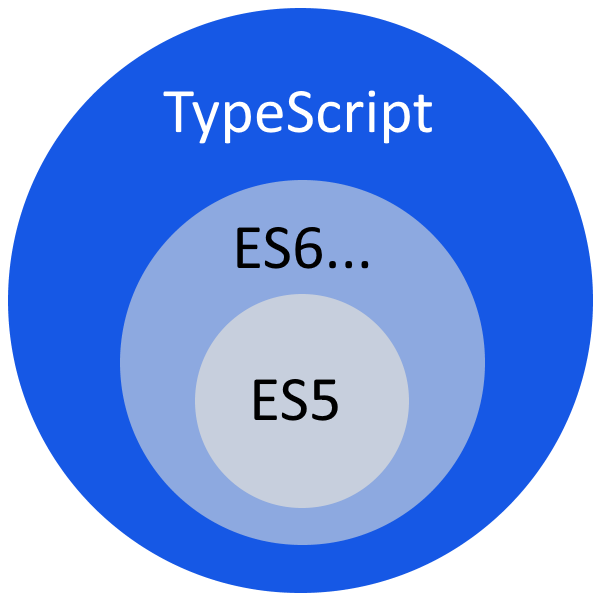
It brings static-typing to frontend development, allowing developers to catch errors more efficiently and productivity gains via integrations with supporting JavaScript IDEs, like VS Code. It's even possible to adopt TypeScript iteratively; as a superset of plain JavaScript, any valid JavaScript program is a valid TypeScript program. Webpacker provides an installer to make it easier to add to your Rails project.
14. Unlock powerful new tools
The webpack compilation and build process provide a large number of hooks to allow behavior modification at nearly any stage. Here is a shortlist of ways you can extend webpack to meet the needs of your system:
- Unit testing through the Rails asset pipeline has always felt like jumping through hoops; now, take your pick of JavaScript unit testing tools like Mocha or Jest.
- Integrate with eslint to standardize code style and syntax and automate fixes
- Add a plugin to analyze the size and contents of your bundles, e.g. WebpackBundlerAnalyzer
- Add a loader to parse your Rails i18n yaml files and provide them as JSON to your webpack JavaScript modules
- Add a plugin to produce "unfingerprinted" clones of your bundles, as with https://github.com/alexspeller/non-stupid-digest-assets
One of my favorite webpack-friendly addons is Storybook. It's a newer tool that allows developers to build components in isolation from the Rails server. This is a great way to represent your UI in various states all in one place without having to mess with real data in your development environment.
![]()
15. Modify source code programmatically
Webpack provides some configuration options that make it easy to modify the output of a module. For example, to "provide" the jQuery import to all modules in your source files, you can add the ProvidePlugin.
This becomes important if you're attempting to upgrade a legacy Rails app to webpack. Many older jQuery plugins, for example, assume jQuery is available in the global scope. The ProvidePlugin configured as follows will instruct webpack to "shim" legacy modules with a require('jquery') statement if necessary:
// config/webpack/environment.js

const webpack = require('webpack')

const { environment } = require('@rails/webpacker')

environment.plugins.append(
  'jquery', // arbitrary name
  new webpack.ProvidePlugin({
    $: 'jquery',
    jQuery: 'jquery',
    'window.jQuery': 'jquery',
  }),
)

module.exports = environment
- Documentation: https://webpack.js.org/guides/shimming/
16. You can still "require_tree" and then some
Sprockets comes with a few conveniences for including files in your asset bundles, including require_tree. Similarly, webpack also has a function for including multiple files in a single statement: require.context. Though more tedious, it's even more powerful. It provides a file filter option, say if you only want to import .svg files. You can also operate on the return value.
Syntax:
require.context(
  directory,
  (useSubdirectories = true),
  (regExp = /^\.\/.*$/),
  (mode = 'sync'),
)
Example: require all the test files in the current and nested directories.
require.context('.', true, /\.test\.js$/)
Example: import all the default exports in the current directory and re-export as named modules
const requireModule = require.context('.', false, /.js$/)

context.keys().forEach(filename => {
  const moduleConfig = requireModule(filename)

  // Get PascalCase name of module from filename
  const moduleName = upperFirst(
    camelCase(
      filename.replace(/\.\//, '').replace(/\.\w+$/, '')
    )
  )

  export {[moduleName]: moduleConfig.default}
})
17. Automatic static code splitting
In Sprockets, a common technique to reduce bundle size and improve cacheability is to move all the vendor code into a separate bundle:
<!-- app/views/layouts.application.html.erb -->
<%= javascript_include_tag "vendor" %>
<%= javascript_include_tag "application" %>
One headache with this approach is having to manually account divvy up the bundles and take great care to avoid load order issues or omitting key dependencies.
Since webpack statically analyzes your source code to build its dependency graph(s), it can also be configured to create separate bundles for vendored and application code automatically. This means, from a single "pack", webpack will produce the vendor and application bundles for you, along with the webpack runtime. Webpacker helpers and config can be used as follows to enable this behavior.
// config/webpack/environment.js

const { environment } = require('@rails/webpacker')

environment.splitChunks()

module.exports = environment
<!-- app/views/layouts/application.html.erb -->

<%= javascript_packs_with_chunks_tag "application" %>
<!--
<script src="/packs/vendor-16838bab065ae1e314.chunk.js"></script>
<script src="/packs/application~runtime-16838bab065ae1e314.chunk.js"></script>
<script src="/packs/application-1016838bab065ae1e314.chunk.js"></script>
!>
No more manual code splitting.
- Documentation: https://webpack.js.org/plugins/split-chunks-plugin/
18. Automatic dynamic code splitting
An even better option to split your JavaScript code over multiple files is to use "dynamic imports". This approach requires absolutely zero config changes. It is the very reason that webpack's creator made webpack in the first place.
When webpack detects a dynamic import function, like the following, in your application code, it will create a separate bundle for that import and load it asynchronously when that code is executed in the browser.
import('pdfjs/webpack').then(({ default: pdfjs }) => {
  // async import!
  pdfjs.getDocument('https://example.com/some.pdf') // ...
})
This technique can help reduce initial download size, help avoid loading JavaScript code unnecessarily, and potentially improve time-to-interactive metric.
19. Use state-of-the-art CSS processing
If you've used Rails long enough, there's a good chance you've adopted SASS or SCSS and you may love it. That's fine! Webpacker supports SASS/SCSS by default. That said, Webpacker also integrates with a newer tool called PostCSS.
![]()
PostCSS, relatively new on the scene, allows developers to transform CSS with JavaScript. It's a pluggable tool that can be configured to enable various capabilities; webpack configures PostCSS to apply some fixes for flexbox bugs and to use a preset-env plugin to polyfill newer CSS capabilities for older browsers, similarly to @babel/preset-env does for JavaScript.
One of my favorite PostCSS plugins is PurgeCSS, which lets you delete unused CSS by comparing your CSS with your HTML markup and/or templates. Such a tool is invaluable when adopting a framework like TailwindCSS, which provides a ton of utility classes, many of which you're unlikely to use in production code.
20. Get asset compilation out of the Rails developer server
With Sprockets in development, automatic compilation and recompilation of static assets is handled through the Rails server. This can become a bottleneck with the ruby process doing double-duty. With the webpack-dev-server, however, asset compilation moves into a separate process so asset compilation can occur independently of the Rails server responding to requests.
The webpack-dev-server is a simple Node.js web server that watches for file changes in your source code directory, triggers webpack to recompile when changes are detected, and serves the compiles assets from memory. It can also, via websocket listener automatically inserted in the browser, autoreload the development browser window when autocompilation completes, if desired.
21. Update code in development without reloading the page
Imagine being able to replace the implementation of a JavaScript module in the browser without having to reload the page. That's Hot Module Replacement (HMR). Not only does this allow for near-instant updates of only code that's changed, but the application and DOM state is retained, meaning there's no need for extra clicks and typing to achieve the desired UI state. There are some gotchas to be aware of when using this tool, but generally speaking, it's a powerful way to speed up development.
- Documentation: https://webpack.js.org/concepts/hot-module-replacement/
22. Take advantage of source map options
Given your JavaScript and CSS source code may be written in one form but compiled to another in development and production, source maps can help fill the gap. Most evergreen browsers support the loading and rendering of source maps in the browser dev tools to allow developers to link the code that's loaded in the browser to the code that lives in your source. It's a really good tool to have in your toolbelt.
Sprockets recently brought source maps to the Rails asset pipeline. In webpack, they've been there since its early days and they're highly customizable; there are over twenty types of source maps supported in webpack meaning there's a strategy for almost every use case. One reason for this much variety is that source maps must be generated as a separate file from your asset bundles so there's a build performance cost. You can save time with the tradeoff of fidelity.
The main point is with webpack you've got a ton of choice.
- WTF is a source map? https://schneems.com/2017/11/14/wtf-is-a-source-map/
- Guide to source maps in sprockets: https://github.com/rails/sprockets/blob/master/guides/source_maps.md
- webpack source map documentation: https://webpack.js.org/configuration/devtool/
23. Implement performance budgets
The first rule of optimization is "Measure first." When it comes to optimizing frontend performance, the first developer I look to for advice is Addy Osmani.
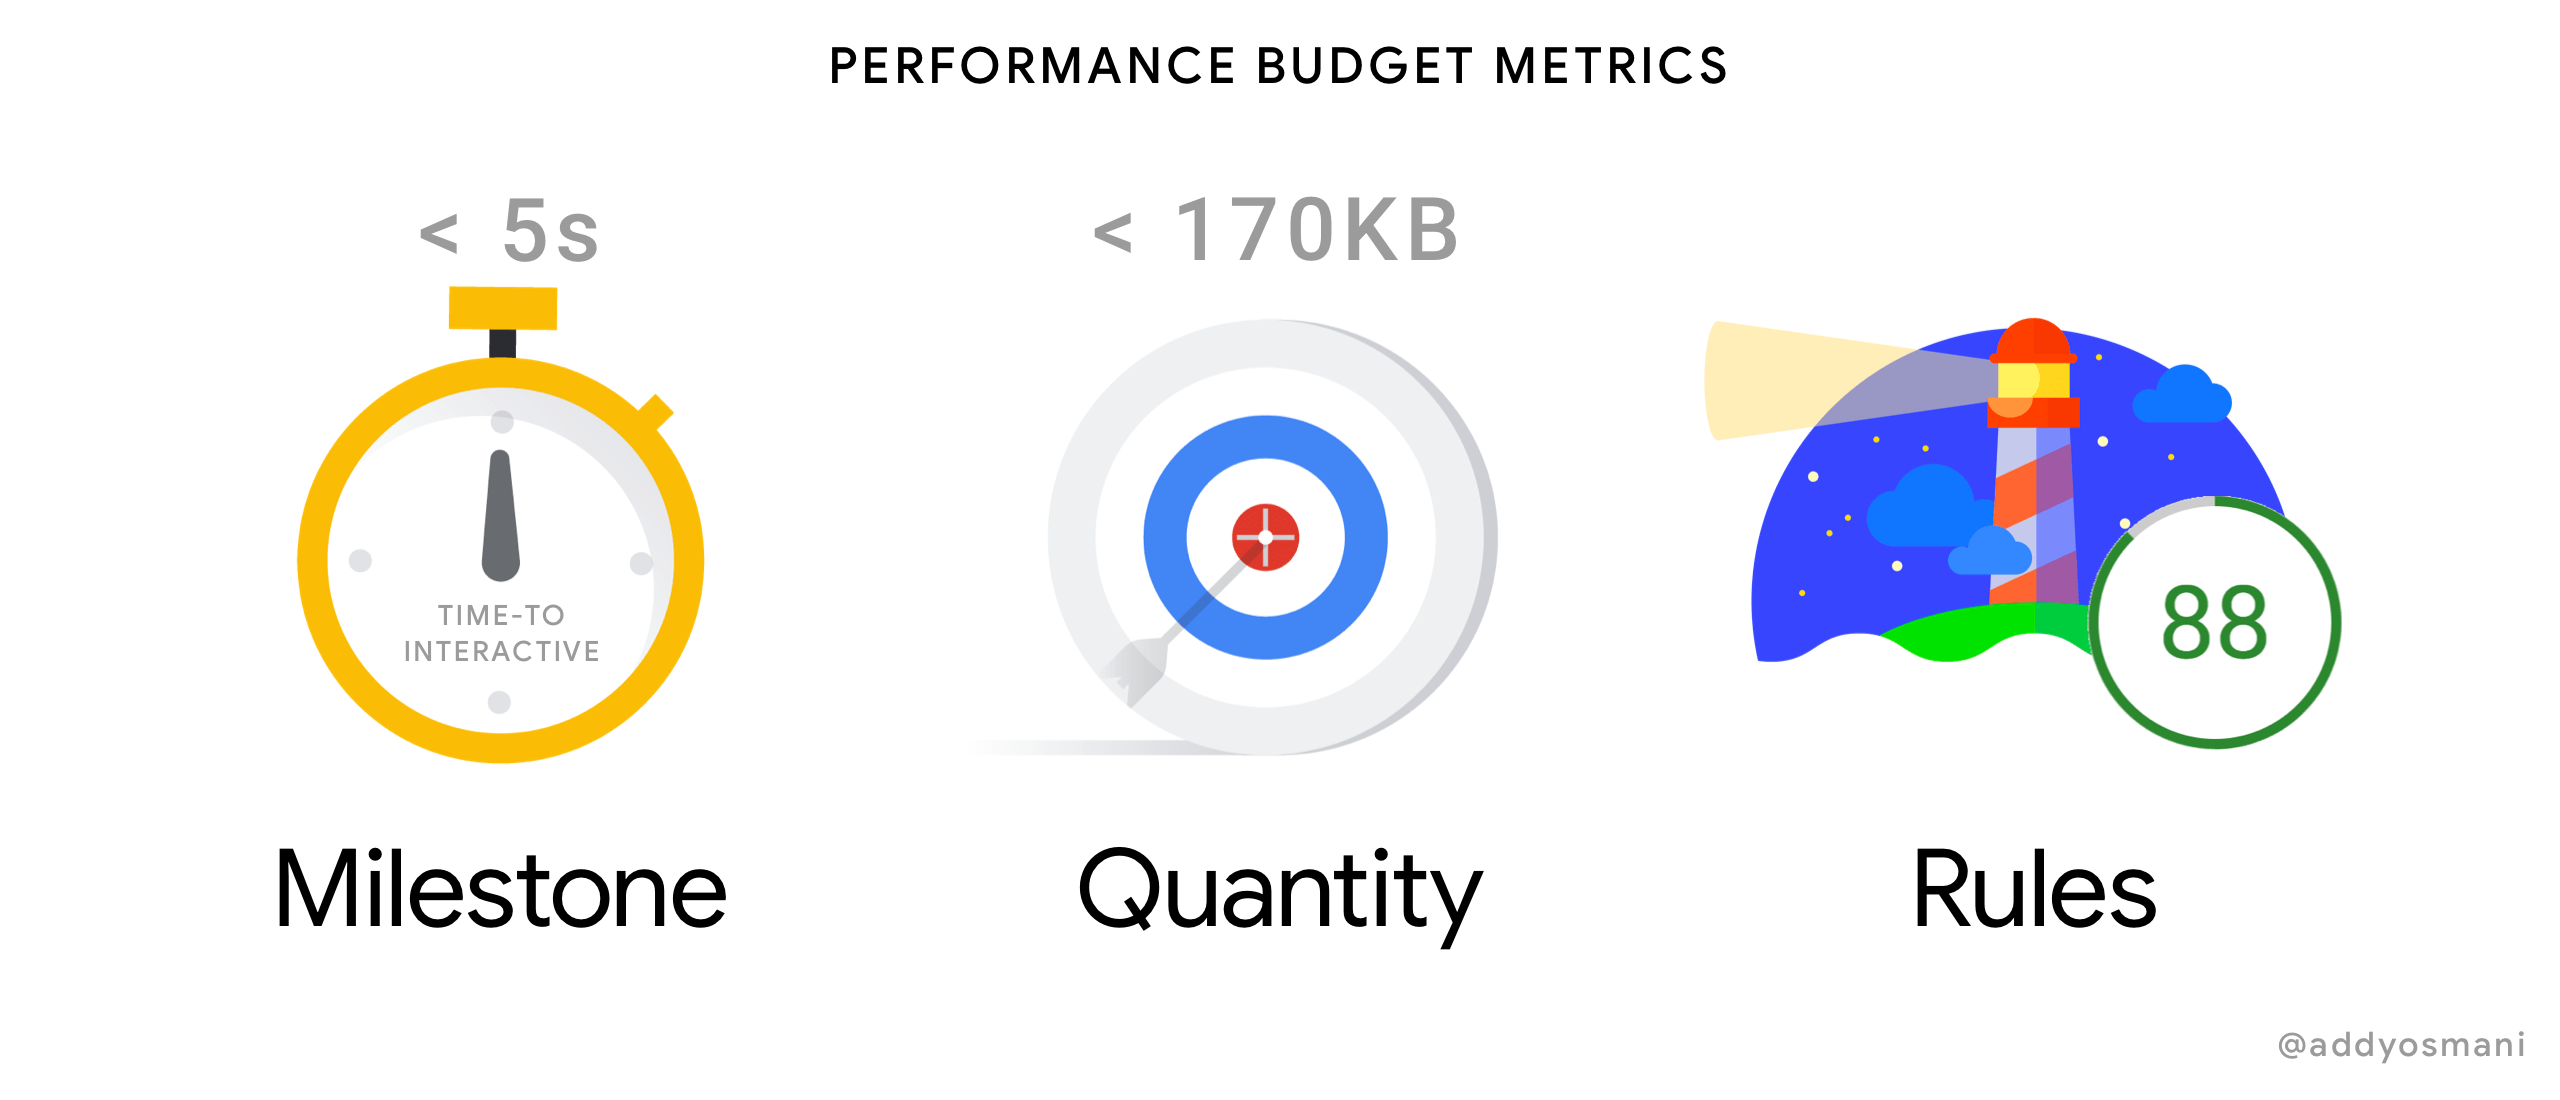
One of his key strategies for measuring frontend performance is "performance budgeting" and how this relates to "time-to-interactive" (TTI). The thinking is you may be able to put a value on the TTI experienced by users of your application. That value closely correlates with the amount of JavaScript you force your users' browsers to download and execute. By limiting the payload size of the initial download, you may be able to improve TTI.
What does this have to do with webpack? Not only does webpack make it easier to split up your bundles, as we saw with the code splitting sections above, but it also provides built-in support for performance budgets. You can customize webpack to print a warning or even raise an error if any bundle exceeds the configured maxEntryPointSize.
- Start performance budgeting https://addyosmani.com/blog/performance-budgets/
- Cost of JavaScript 2019 https://medium.com/@addyosmani/the-cost-of-javascript-in-2018-7d8950fbb5d4
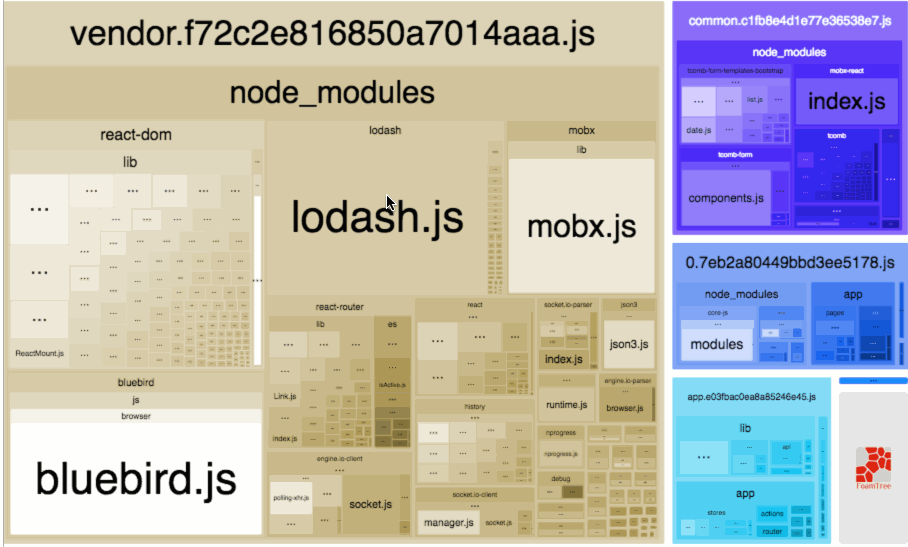
24. Peek inside the bundles
One of my favorite tools for debugging webpack is the webpack-bundler-analyzer. Add this to your build and it will generate an interactive treemap that visualizes the relative size and contents of all your bundles. Wondering how much lodash is adding to your overall bundle size? Use the bundle analyzer tool. Think there's a bug in with one of your dependencies or in your webpack output? The bundle analyzer may help you identify it.
25. Shaking the tree
I'd be remiss if I didn't mention one of the favorite JavaScript bundle buzzwords, tree shaking. All this means is that webpack can remove unused code from your build when certain conditions are met. This typically means that the module(s) in question is an ES module, that Babel is configured to handle ES modules, and that there are no side effects from importing the module.
A good use case for tree shaking is lodash. When loaded in its entirety, the library adds around 75 kb to the resulting asset bundle.
import _ from 'lodash' // OR

import { map, uniq, tail } from 'lodash'
The following approach allows webpack to limit the resulting file size:
import map from 'lodash/map'
import uniq from 'lodash/uniq'
import tail from 'lodash/tail'
- Lessons on tree-shaking Lodash with webpack and Babel https://www.azavea.com/blog/2019/03/07/lessons-on-tree-shaking-lodash/
Wrapping up
There it is. I hope this has been a worthy introduction to some exciting possibilities and use cases for adopting webpack in your Rails app via Webpacker. Like I said earlier, there is a tradeoff that comes with the overhead of managing many smaller JavaScript dependencies along with overcoming the "barrier to entry" in getting up to speed with how webpack works.
I, for one, feel the tradeoffs have been worthwhile.